Tutorial CPAC Imaging Pro
Running CPAC ImagingPro 3
Running CPAC ImagingPro 3
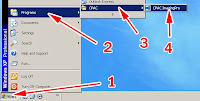
You can run the CPAC Imaging Pro Program by clicking the CPAC ImagingPro icon
Or click Start => Programs => Digital Master => CPAC Imaging Pro
Components in CPAC ImagingPro 3
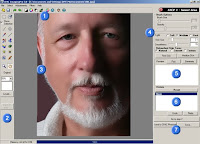
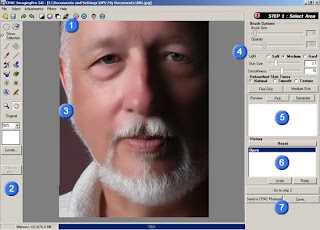
User's interface consists of:
1. Menu items and shortcuts
2. Toolbars
3. Workspace pane
4. Configuration palette
5. Preview palette
6. History palette
7. Go to Next Step, Send to other programs, and Save buttons
as illustrated:
Main component properties CPAC ImagingPro 3
1. Menu items
1.1 File. Submenus within File are:
- Open. To open work files in the program. Valid file formats include Jpg, Jpeg, PSD, BMP, and TIFF.
- Save. To save work files.
- Close. To close the open files, in order to restore memory to system.
- Acquire from scanner
- Batch processing use for retouch many files at once
- Import Clothing Images. To import clothing image files into the program.
- Import Background Images. To import background images into the program.
- Manage Clothing Images. To remove, add, categorize, and rename clothing images. See Importing and Managing Clothing for more information.
- Manage Background Images. To add, remove, categorize, and rename background images. See Importing and Manageing Background Images for more information.
- Exit.
- Preferences. To store some general program settings, such as:
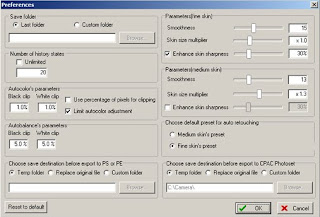
Save Folder. You can choose to save images to Custom Folder or Last Folder.
Number of History States. You can choose to save Unlimited number or enter a number for the desired previous image's states.
Autocolor's parameters. Use for set the parameter of auto color button
Autobalance's parameters. Use for set the parameter of auto balance button
Parameters (Fine Skin) / (Medium Skin) As default the Smoothness level is set to. If you want the program to make less adjustment to the picture, use the less Smoothness level. The program will continue to use your setting automaticall next time. High Skin Size Multiplier level results in the more natural looking skin.
Choose default preset for auto retouching. To set that auto retouching button will use fine skin's preset or medium skin's preset
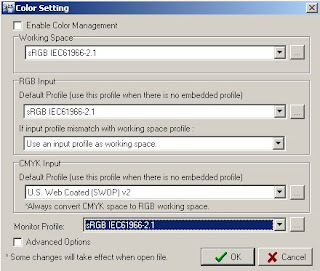
Color setting. For set the color management system
1.2 Select. The submenus are:
- Select All. To select entire area of an image to edit.
- Deselect. To undo entire area of selection.
1.3 Adjustments. Its submenus are:
- Levels... To adjust image's light levels.
When complete, click OK, or Cancel. To discard all adjustments you have made, click Reset.
Color Balance... To adjust the image's colors. For more details, see Editing Colors
- Auto levels. To automatic adjust levels
- Auto color. To automatic adjust color balance
- Auto balance. To automatic adjust brightness balance
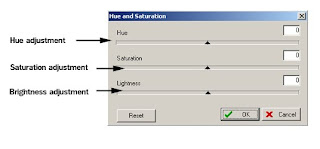
- Hue / Saturation... To adjust the image's hue and saturation levels.
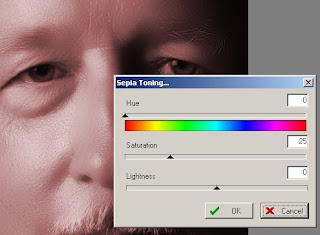
- Sepia Tonging. To convert photos into sepia mode. See Sepia Toning for more information.
- Shadow/Highlight. To preserve details in the shadowed and highlighted areas by increasing the light level for the dark areas, whereas reducing the light level for the bright areas. See Adjusting Shadow/Highlight for more information.
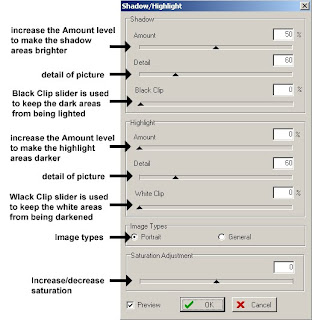
- Desaturate... To revert colored images into black and white images.
- Portrait Warping... To adjust facial features, such as to eliminate open-mouth gap, to make the face leaner or fuller, and to add a slight smile, etc. For further details, see Warping Techniques to Improve Facial Features
- Change Clothing. To add outer layer of clothing For furthur details, see Adding Clothing
- Change Background. To change the portrait background. For furthur details, see Changing the Background
- Add eyebrows or eyelash, see Add eyebrows or eyelash
- Rotate Canvas. To rotate the image: clockwise, anti-clockwise, and 180 degrees.
1.4 Filters
- Portrait Colorize. To automatically colorize the portrait foreground. For more details, see Coloring Black/White Photo.
- Soften Filter. To edit soft looking images, marriage photos, etc. For more details, see Making Soft Looking Photos
- Unsharp Mask. To make the portrait look sharper. For more details, see Sharpening the images
- Dust and Scratches. To eliminate dust and scratches from scanned images. For more details, see Eliminating Dust in the Scanned Images.
- Vignette filter. is a filter for add vignette effect in picture, see vignette filter
1.5 Help
- CPAC ImagingPro 3 Help within program
- CPAC ImagingPro 3 User's Guide VDI, which can be viewd if installed on the hard disk.
- About CPAC ImagingPro 3
2. Toolbars

* For many tools, you can adjust the brush size, opacity, and hardness, by using the right click to bring brush's options.
** You can also use the "[" key and "]" to adjust the brush size, or you can use the setting scales.
2.1 Select or Circle Tool. (Shortcut = Ctrl+S) To select working areas. Selected areas are highlighted in red.
2.2 Eraser Tool. (Shortcut = Ctrl+E) To erase selection or over-painted areas.
Show Selection Tool. To show or hide dotted selected-area lines.
2.3 2.4 Brush Tool. (Shortcut = Ctrl+B). To edit light, which does not affect skin textures. The brush is used for painting the color shown in the Color frame (2.19), to the selected areas. With this tool, you can pick colors for painting by holding down the Alt key, and left click to pick a color. Accessible in Step 2 only.
2.4 Retouch or Sieve Tool. To refine skin size. You can select areas to be retouched. Then adjust the skin size in the selected areas. Accessible in Step 2 only.
2.5 Eyedropper Tool. To pick colors while using Brush tool. You can use the Alt key as a shortcut key. Accessible in Step 2 only.
2.6 Line Tool. (Shortcut = Ctrl+L) To draw a nose line, to identify shading. Accessible in Step 2 only.
2.7 History Brush Tool. (Shortcut = Ctrl+H) To revert the edited areas to their previous states. You can choose the desired working area size and opacity.
2.8 Stamp Tool. (Shortcut = Ctrl+T) To copy one area, and put it on the other area to hide or correct defected areas. To use it, hold the Alt key, then left click to select an area to copy. Then move the mouse pointer to the target area, left click to put the copied area over the target area.
2.9 Color Brush Tool. (Shortcut = Ctrl+R) To paint over an image without affecting the image's luminance.
2.10 Sponge Tool. (Shortcut = Ctrl+O) To increse or decrease image's saturation level.
2.11 Dodge Tool. (Shortcut = Ctrl+G) To lighten images.
2.12 Burn Tool. (Shortcut = Ctrl+U) To darken images.
2.13 Repair Stamp. To fix specific spots, such as pimples, scars, and tears. It copies details from one area and applies it to the other areas and then even out teh difference. Click the Alt + left click to select the copied area. then click the mouse pointer on the areas to be fixed.
2.14 Pencil tool. To paint color in the images.
2.15 Zoom or Magnifier Tool. (Shortcut = Ctrl+SpaceBar, "Ctrl+",Ctrl+= to zoom in, Alt+Spacebar,"Ctrl-" to zoom out) To expand or compress the image size for viewing. This only affects the image's displayed size, not the actual file size. You can hold down the Ctrl+SpaceBar, and left click to zoom in, or hold down the Alt+SpaceBar, and left click to zoom out.
2.16 Hand Tool. (Shortcut = Spacebar) To handle and move an image so that you can see its parts that extend outside the workspace. Alternatively, you can hold down the Spacebar as a shortcut.
2.17 View Original Button. To display the original state of the image. You must left click and hold on this button to display the original copy, and you will come back to present state after you release the button. This makes it convenient to compare the original and editing states of the image.
2.18 Display Size.
2.19 Current Color Frame. The Brush and Color Brush use the color shown in this frame to apply to the selected area. Click in this frame to adjust the displayed color.
2.20 Levels Button. To adjust the intensity levels of brightness in the selected areas. If there is no area selected, the new levels will be applied to the entire image.
2.21a. Back to Step 1 Button. To go back to Step 1. You can go back to Step 1 without losing the selected settings, so that you can adjust the smoothness or skin size and did not need to select the same selection again. You can use this tool to further work on the image, when you are not satisfied with the automatic skin size and level adjustments made by the program.
2.21b. Back to Step 2 Button. To go back to Step 2. You can use this tool only when you are in Step 3.
2.22 Repeat Button. To go back to Step 1 with the edited image. You can use this tool only when you are in Step 2 and 3.
3. Workspace Pane
Images will be displayed here.
4. Configuration Palette
To adjust tools' settings, which consist of:
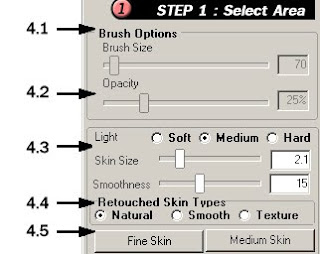
4.1 Current work step. From Step 1, to Step 3.
4.2 Option value settings, corresponding to selected tools.
4.3 Auto skin adjustment settings.
4.3.1 Diffuse. To adjust the image's diffusion. Hard diffuse is proper for very high contrast image and soft diffuse is proper for low contrast image
4.3.2 Skin Size. To adjust the skin size. Smaller value indicates smaller skin size.
4.3.3 Smoothness. The higher value produces smoother shades and shadows. Typically, the smoothness value is 15. But you can adjust the value based on the portrait states.
4.4 Retouched Skin Type. To choose between Natural, Smooth, and Texture options. For sample images, see Texture Adjustment
4.5 Automatic value setting buttons: Fine Skin and Medium Skin. After selecting the face area, click one of these buttons to identify the face area size. If you click the Medium Skin button, the program will automatically set the skin size value to medium skin size (more natural skin texture). And if you click the Fine Skin button, the program will automatically set the skin size value to Fine Skin (smoother skin texture), whereas the Diffuse and Smoothness will be set to Standard. You can choose to work with either the Fine Skin or Medium Skin according to your liking.
5. Preview
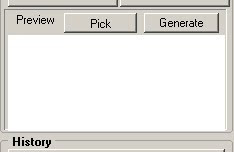
The program will generate a preview for the image that you are working on. Click Pick to select an area to preview. Then click Generate to have the program generate a preview for the edited image.
6. History States
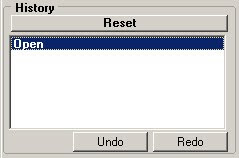
Previous states of adjustments that you have made will be stored here. You can use the Undo or Redo buttons to step back or step forward. Or you can pick on the state list to go directly to that state.
7. Go to Next Step, and Save (Save As).

consist of:
7.1 Go to Next Step. This will take you to the next step. Step number varies according to the present step you are in.
7.2 Save (Save As) To store edited images. When you click this button, a new pop-up window will appear. Then you can enter a name and identify a file location for the image.
7.3 Export to CPAC PhotoSet. The program will save active image to the destination folder set in preferences. Then it will automatically the image to open in CPAC PhotoSet.
Portrait Editing with CPAC Imaging Pro
Editing Images with CPAC Imaging Pro
1 - Open the CPAC Imaging Pro Program.
2 - Open the image file that you want to edit by clicking File -> Open or click the F3 key on your keyboard.
3 - In Look In dialogue box, locate the image file. You can change the display mode to Thumbnails to display small preview picture, by clicking the Views button on the menu bar, and select Thumbnails, as illustrated.
Choose the desired image by double click on the image, or click once on the image and then click the Open button.
4 - Once the image is displayed in the program, you can start to edit the image. For a low contrast or dull-looking image, you should edit by using Levels... in the Adjustments menu. For a distorted-color image, you should edit by using Color Balance in the Adjustments menu. (For further details, see Color Correcting.) You can use the Rotate Canvas function in the Adjustments menu to rotate between the landscape and the portrait positions.
5 - Adjust the image's viewing size by using the Zoom tool. Alternatively, you can hold down the Alt+Spacebar on your keyboard, then use mouse clicks to zoom out, or hold down the Ctrl+Spacebar, and use mouse clicks to zoom in. You can also use Ctrl+ or Ctrl- to zoom in and out respectively.
The Hand tool is used to move the viewing position of an image in the workspace pane. You can hold down the Spacebar on you keyboard as a shortcut for this tool.
6 - Click the Select Tool icon in the toolbar on the left. The Select tool is presented by a circular brush tip. You can adjust its size by using the Brush Size slider on the setting pane on the right. Or use ] key to increase, and [ key to decrease. After that, use the Brush to paint over the face area, including the neck. It will appear as illustrated.
Apply selection all over the face.
7 - Use the Erase Selection Tool to paint over the areas that are not applicable to face skin tone, such as eyes, lips, and teeth.
8 - Click the Fine Skin or Medium Skin button, to set the head size and automatically configure the skin and smoothness size. The default smoothness value is 15. You can display a preview, by clicking the Pick button and click on the area you want to preview. If you don't like the preview result, you can adjust the smoothness value or skin size as you desire. When complete, click Go to Step 2 button, to have the program make the adjustments.
9 - In Step 2: Make up, the program will edit and adjust the light and shade level automatically. The result is as follows:
You will notice that most of blemishes and spots fade out. Yet, the image doesn't look flat, as shades and textures are still preserved.
10 - Use the Brush tool to edit the lights and colors in areas where you are not satisfied with, such as to lighten the dark area under the eyes, or to adjust the eyebrows. You can adjust the Brush's Opacity and Size in the Brush's options setting.
Also you can enhance the skin sharpness by ticking in Enhance skin sharpness checkbox, and identify a value by using the slider or enter a number directly into the box beside the slider.
* For further details on light and shadows editing adjustments, see Professional Portrait Editing Techniques for CPAC Imaging Pro
11 - For the direct face shot portrait, you can add a reflect light on the nose bone by using the Nose tool. Then choose a reflect light to use on the nose area that bright light fall on. You can do this by hold down the Alt key, and left click on the reflected area to pick a color. Next, click on the nose tip, after that on the nose base. The program will automatically draw a line to connect these two points. You can adjust the Brush Size as well as Opacity. Generally, the opacity value varies between 20-30.
12 - In the areas where the skin size still appears too rough, you can use the Retouch Tool to adjust the skin size in a specific area. Select the Retouch tool, and hold down the brush in the area where you want to retouch. When you release the mouse button, the Retouch dialog box will display.
Specify the skin size you desire, then click OK. Program will automatically adjust the skin size in the selected area according to your setting. The skin size value specified should be less than the skin size configured in Step 1 so that the new adjustment will take affect on the image.
13 - When complete, click the Go to Step 3 button to go to next step.
14 - Step 3 is to finalize all the works. You can call back previous states of image and apply them to present image. Moreover, you can fix the over-adjusted areas by using the History Brush tool. Select this tool. Click on the area you want to revert to previous states, such as areas around the eyes, nose sides, and jaw line. This will add sharpness back.
15 - In this step, you can fix any defects that are still left, such as tears and wounds, or pimples with the Stamp tool. By using this tool, you can copy a perfect area, and paste it on the defected area. Select the Stamp tool, move the tool over to the area that you want to copy, hold the Alt key, and left click. Move the mouse pointer to the defected area, click the left mouse button. The perfect area will be applied there. You can set the desirable brush tip size as well as the opacity.
16 - When complete, you can use the Save button to save it in the location you identify.
When you click the Save button, the following dialog box will appear:
You can identify a file location under Save in, and assign a name to the file in File name message box. After that click Save. The program will automatically store the image.
Professional Portrait Editing Techniques with CPAC Imaging Pro
After opening the image with the program, you can edit the brightness, color or contrast levels for a dull-looking or color-distorted image. The steps are first to adjust its brightness. On the Adjustments menu, select Levels. Then the following window will appear.
You can adjust the brightness level manually. Otherwise, you can use the Auto Levels button so that the program could calculate the appropriate value for you.
After adjusting the brightness, you can correct the picture color. If the colors are distorted; for instance, the color is too yellow, you can make the correction by selecting the Color Balance function from the Adjustments menu. Then the following window will appear.
For instructions on color editing, see Editing Colors with CPAP Imaging Pro
In Hue and Satuation- > Adjustments, you can increase the saturation slider to saturate the image.
1. After adjusting the image's colors and brightness, use the Select tool to select face regions for editing by adjusting the appropriate brush size.
2. Use the Select tool to paint the face area in red, including neck but not ears and hair, necessary to edit. If it is the portrait of a balding man, you should select the entire head.
3. Select the Erase Seletion tool from the toolbar to erase selection in the areas that are not to edit, such as eyes, nose and mouth.
4. Select the style you want by clicking the the Medium Skin or Fine Skin button. The program will set the skin size to match with the working picture. Furthermore, the program will set the diffusion and smoothness to the standard value. You can choose the desired skin texture from Natural, Smooth, and Texture options. Adding texture will help make the picture look more substantial. The Smooth option makes the skin look softer than the Natural option.
5. If you want to preview the result, you can generate a preview by using Creating Preview Spot to place on the area you want in order to check on the result. Or just click Enter or "Go to step 2" button to experience portrait editing.
6. Normally the program will set the default diffuse value to Medium. If the editing picture has too high contrast, you need to increase the diffuse value in order to make the entire image look smooth. Typically you do not have to adjust this option.
7. For the skin size, when pressing the Fine Skin or Medium Skin button, the program will select it based on the face size. If the Medium Skin' button is clicked, the program will set the skin size bigger than the Fine Skin button so that the image will appear more natural and rough than the Fine Skin button. However, you can adjust the skin size as you desire.
8. Usually the program will set the Smoothness at 15. If the editing face appears too high of the contrast or too oily then the default smoothness can't smoothen it. You can increase the smoothness value in Step 1. If the image contrast is too low, which makes the picture looks flat, you can decrease the Smoothness value.
From the sample image, when using smoothness value of 15 is not as good as when using smoothness value of 20, which make the picture look nicer.
Sometimes you can still re-edit the picture already edited by the program for the better perfection of the image by zooming it out although the first edited version of the image does not look too oily and has good shade and shadow. After doing so, observe thoroughly whether or not there are anywhere looking unsmooth. From the sample image below, you will first start at the forehead.
Spot 1 See the stain on the highlight zone. You can edit by using the Brush tool together with holding down the Alt key and mouse clicks to select a color from the bright zone. Then set the brush opacity about 20%, configure the brush size to ensure it covers the stain region and lastly left click to edit the smoothness.
Spot 2 See the border line of the uneven shade and shadow. Select the color from the center of the border line so you get the average color. Then paint it to dissolve the border line.
Spot 3 Eyebrows being knitted makes the portrait look serious. You can edit by selecting the color and remove the knitting to make the image more lively.
Spot 4 See an uneven skin on the chin. Use highlight to edit the brightness and remove the uneven spot. For the border line, use the same method as Spot 2.
Spot 5 Since the nose is the most outstanding spot on the face in a photo, you should edit any defect, such as wryness or lack of bone. If the problem is lacking the nose bone, edit by using the Line tool and then picking a color from the bright zone on the nose region (by holding down the Alt and click mouse), set brush size to match with the nose bone, then spot first at the center between eyes and spot again at the nose tip. After that, the program will draw the line to be the nose bone. However, in the sample, there is also light from aside, so you can do only draw a highlight line on the nose bone on the side which reflects primary light in order to enhance the nose.
Spot 6 In the example, there is shadow appeared from the nose bone and make the nose look flat to a cheek. You can edit by using the light from the cheek and place it near the base of the nose to make it more outstanding from the cheek.
Spot 7 Eyebrows are also another outstanding spot on a face, so you need to ensure they are drawn fully. In the sample, the end of the left eyebrow disappears because of the reflection. To edit, select a color from the eyebrow and place the brush tool and stretch the eyebrow further. However, beware of painting the eyebrow too deep because it would make the photo look unnatural.
After finished this, you can make more corrections by using the Clone Stamp Tool to remove some spots or use the History Brush Tool to call back the original appearance of the face, such as moles.
Want more details, please download the ebook Tutorial CPAC Imaging Pro 3, on the link below.
In this ebook contains about:
Installation guide
Introduction to CPAC Imaging Pro
Portrait Editing
Professional Portrait Editing Techniques
Couple and Group Portrait Editing
Automatic face selection and retouching
Batch processing
Add eyebrows or eyelash
Adjusting shadows and highlights area
Make a soft looking image
Changes clothing
Changes the background
Color Correcting
Black and White Image Coloring
Portrait Warping Techniques
Dust and Scratches Diminishing
Vignette filter
Sample Images
Working Tips
Tutorial CPAC Imaging Pro 3 Download
Source :
CPAC ImagingPro
Labels:
Tutorial
Thanks for reading Tutorial CPAC Imaging Pro. Please share...!
